| HOME | The Boa Knot & The Constrictor Knot |
Here's how to make a Boa Knot:
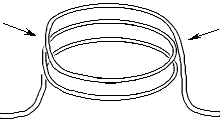
Step 1: Make two (2.5 to be exact) coils that spiral clockwise upward, shown below.
Step 2: Grab the coils with both hands at the position shown in the first diagram by the arrows below. Note how the ends of the coil point toward you. There should be three cord parts between thumb and fingers of each hand.
 |
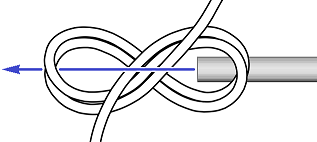 |
Step 4: Insert the object(s) you wish to bind through the two loops of the figure-8 shape as shown. Alternately, you can fold the right loop over the left loop, and throw the coil over the desired object. Pull the free ends to tighten.
Summary of Steps: Clockwise upward coils. Clockwise twist. Fold.
The Constrictor Knot is a very close relative of the Boa Knot, and can be made in exactly the same manner as shown above, except that you start with only one full coil instead of two. There are other ways to tie a Constrictor in the bight, but the coil-twist-fold method is very easy to remember once learned.
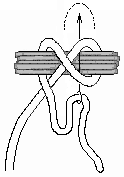
You don't have to tie the Constrictor Knot in the bight. It can be tied with the end of the rope as well. When tying a Constrictor with the end of the rope, you can make it easier to untie by completing the knot by pushing a bight of rope under the final tuck, shown below.
| Slipped Constrictor Knot | |||
 |